Monday, September 2, 2013

Thoughts on Cooperative Learning

Someone once said, "You don't know tired until you know teacher at the beginning of the year tired."
 
But I have gotten some rest since the first week is over and we celebrated with a 3-day weekend.  Now that I can actually think for a minute, I wanted to share some resources that you might find helpful for the beginning of the year.
 
At this point I doubt there are many that have not heard of Cooperative Learning or Dr. Kagan.  If you haven't you should Google it.  I went to a wonderful university (TCU!!!) that had us read Dr. Kagan's book on Cooperative Learning.  When my district began implementing these strategies I was ahead of the curve (that doesn't happen too often).  As I have become a trainer / presenter I have heard some people mention that they aren't big fans of Cooperative Learning.  When discussing this I have noticed a few trends: trying to implement too many of the strategies and jumping in to the strategies with content immediately. 
 
First of all, as with any idea or resource - find the good parts of it and use those.  You do not have to use pieces that do not fit your personality or class.  I stick to a few tried and true Cooperative Learning strategies that work for me: inside/outside circle, 4 corners, numbered heads together, and mix-pair-share.
 
One major mistake I see new and veteran teacher alike make is that they try the strategy with content immdeiately.  For instance, they try inside/outside circle with a grammar activity.  The teacher introduces the strategy of inside/outside circle and then has the students try it with the inside circle holding a word card and the outside circle has to say if that word is a verb or a noun.  This sounds great...just not for the first time.
 
That is why at this point in the year I introduce many of the strategies even though I won't put real content into them...yet.  I introduce inside/outside circle and have the inside circle holding a card with their name on it.  The outside circle goes around and reads their friend's names.  So we are practicing forming circles, going around them, etc. but the 'content' is reading another child's name.
 
I do the same thing with 4 corners.  One day I have pictures of candy, cake, cookies, and ice cream in each corner of the room.  I show the students the four pictures and explain we will be playing a game.  Then tell them to think of which one of the four they would like most.  I have them close their eyes (so they don't pick what their friend picks) and tell the kids who like candy most to stand.  They move to that corner (with their eyes open).  I repeat for the other three choices.  Then I have the students partner up at their corner and read each other's name.  After we have that down I do another name activity such as look at each other's cards and find out how many letters you two have in common.  The point is that you are doing something super-easy at this point so the focus is on learning the stucture of the activity.
 
At this point in the year when we have the ability to take it a bit slower I teach the structures.  That enables me in a few weeks, when we are fully into heavy curriculum, to have my students use the structure with content.  So we might go to four corners, partner up, and re-tell the story I just read aloud or share what we learned from a science experiment.  These are great ways to enhance student learning if you teach the structure before you leap into content. 
 
Here are some pictures I use for 4 corners.  It is the only strategy that requires a little pre-work so I thought I'd share what I have so you don't have to re-create the wheel.  I hope you will try some of your own Cooperative Learning and help engage your students.  Maybe this will give you something to start with. 


Happy teaching ~

Monday, August 12, 2013

Where Are We? Signs

I'm getting really excited for this new year to start!  There is just something about the beginning of the year - filled with possibilities and nothing has beaten you down yet. 
 
Our school is going through a major shift:
new principal (and our assistant principal's first year was last year) and 13 new teachers!  That doesn't even count the grade switching of some teachers.  But I'm excited...new faces and new ideas make me happy. 
 
So to welcome some of the new teachers I got my craft on.  Here are some hallway signs I made.


I tried to match class themes if I could - safari, beach, camp, etc.  My personal sign is done with dogs - shocking, I know.


One of my teammates made the whole team matching 'Where are we?' signs as Christmas gifts a few years back. I stole the idea from her and started making these.  One of our school policies is to post where you are if you are not in the classroom.  This sign is easy to have as a classroom helper change as you leave.  Plus they are just so adorable.
 
Have fun getting ready for this upcoming year ~

Thursday, August 8, 2013

Daily 5: Book Bag Management Tip

I have tried many systems for changing out books. The system I used the last couple of years has been the simplest and best.


 My students have several morning jobs: notebook check with me, lunch choice, bathroom, morning work, etc. When they finish their morning work they know to do unfinished work. If they do not have any unfinished work then they may choose centers (basically Daily 5, computer, or math games).


Another option is to change out books. They do this independently because I have trained them how to look at books and decide if it is a ‘good fit’ book or not. This helps make sure not too many students are changing out books; many are still working on other morning jobs. I have also noticed that my students that need to change more frequently make sure they get everything done so they can change out books. 

This also works in reverse - if a student wants to change out books but didn't get a chance to do so then I use that as a teachable moment that he / she needs to be more diligent at getting work done in the morning so he / she can get to change out books.  Works like a charm! 


If a student makes a bad book choice…it happens every so often…I notice within a week because I have them bring their book bags to my guided reading group.  That way I can monitor what is in each book bag.

This is the simplest management for book bags I have found.  After the students have been trained, it practically runs itself.

Tuesday, August 6, 2013

Books, Books, Books

No one ever told me this about books. I wish they had! It might not have taken me 3 years of teaching before I got my books in order. We all know that an early literacy classroom should be full of books. However, I believe you should have 4 distinct sets of books.


First, you should have a class library. These are the books the students will choose to read on their own. These books should NOT be leveled (because in life the books are not leveled). They should be grouped by theme: Berenstain Bears, Clifford, sports, Magic School Bus, fairy tales / folktales / fables, etc.
If you haven’t done this yet – take all your books (this will take time) and spread them out. Then start noticing the categories that emerge. I noticed I had a lot of books on the United States symbols. I never could read all of them during that unit so creating a library box of USA was the perfect way to utilize those books I didn't teach from. One more note about your classroom library – the books need to be facing the students. I have never been drawn into a book because of its spine. The cover is what catches my eye and interest. This is the same for students. Find a way to let the students easily see the covers of the books as they browse.


I have use color dot stickers to easily mark my books. You will want to find a system that works for you and your students. A friend of mine didn’t have the space to have her books facing out, but she still made it easy for the students to pull a box and browse the covers. The classroom library is going to be the main source of books for the Read to Self book bags if you use Daily 5.


Second, you should have your teacher books. These are books that you cannot have in the class library because you need them every year to teach from. I have started buying duplicates of books that I notice my students really love. That way after I have read and taught from that books I can put out the other copies for them to add to their books bags.  However, teacher books are not for student use. They are for a specific teaching purpose. These books I have organized in book bins with the spines out since they are for me.


Third, you should have homework books. These are books that can get sent home each week. I use the basil adoption leveled readers, phonetic book (i.e. Starfall books), and the old basil adoption leveled readers. Because my district mandates that I use the basil to pace my spelling I have the books ordered by the phonetic rule / spelling rule. Most of those books are leveled-ish…I don’t always agree with the level. I have many copies of each of these books so if one happens to get lost then I still have many other copies. Once a students has lost several books I go to photocopy / black and white books only for them. In 8 years of teaching I have only had to do that twice. If you have a good organizational system to send books home and return them then you will not lose many books.


Fourth, you should have guided reading books. These are leveled books that you plan to teach in small group. I use a lot of Wright Group Leveled Readers / Rigby Leveled Readers / Reading A to Z books. During my first few years of teaching I had to do my guided reading using books from the school’s leveled library, the basil adoption, or just a few books I had multiple copies of. It was not a good system – I didn’t do enough guided reading because of this.


So my lesson learned is to make things easy: easy to see, easy to organize, easy to use. I hope you will consider looking at your classroom books and thinking about breaking them into these separate categories. This would have made me a better teacher if I had thought about it sooner.

Tuesday, July 30, 2013

Fractions

I love fractions! It is one of the areas that our math curriculum - Investigations - does not really cover. So we use a bunch of resources to put together to help the beef up the sad enVision lessons. Here are some of the ideas I use. Hopefully you can find something fun to add to your fraction lessons. Also, please share if you have something that really works for you.

Fraction Lesson Plans

Start off your fraction lessons with asking students to choose how much of a cookie they want. Casually make a t-chart with ¼ and ½ on the chalkboard and have kids put sticky notes with their names to vote. Use the projector to cut a cookie and go over what the different parts of fractions mean…then watch their faces as they realize what a terrible choice they made! Then have pity on your students and let them re-vote.


I also have some shapes cut up into pieces and pass them out. Then we put them together and talk about if they are fractions or not – they have to be equal pieces to be a fraction. Notice the purple paper has 3 parts and 2 are the same and 1 is not. I also have 2 hearts – one is broken into 2 equal pieces and the other is not. Make sure you have examples and non-examples for this activity. It really helps drive the discussion.


One of our warm up activities during our fractions unit is a picture match up. I take current class pictures and cut them up into equal parts. Then I play music and wait for them to find all of their pieces to make a picture. I write the fractions on the back each piece but don’t say anything about it. Once we have all found our groups I have them turn over the pieces and ask what they notice. They are all SO surprise that they have the same thing as their partners. And that all the groups that had 4 pieces have the same thing written. Again – this type of intention before the lesson helps drive the discussion during the lesson. This activity is always a favorite because it uses pictures and kids do love pictures of themselves and their friends.


I'm not going to lie...another reason I love fractions is I know summer is right around the corner when we get to this unit.

Thursday, July 18, 2013

Hallway Flashcards

With pressure to not waste a single moment in the day I tried to find a way to buy back some time in my day. We take a couple of whole class bathroom breaks a day. To help my students use that time more efficiently I put some sight word flash cards and math fact cards on rings. This is completely optional for them to use, but I’ve only seen 3 students choose not to use them since I started it. I guess it’s all in how you sell the idea. I told them I didn’t want to waste their brains and that they could do some bonus learning in the halls. It’s amazing how the word ‘bonus’ makes kids want to do something.  


Most of my students know their sight words so I tell them the halls are the perfect time to learn how to spell them. It took some training on how to read the word, close your eyes and try to spell the word, then open them and check. But after a few days you can see them using the strategy. If you use the Scholastic Systematic Sight Words curriculum then the flash cards are in the back. But you could print off cards for any sight word system you use.


Our school is also pushing that the students memorize math facts. Although I highly disagree with this age group memorizing facts I do try to follow directions. Our math program (Investigations) focuses on patterns in numbers – especially the number 7 and 10. After we have covered those units I create 7 and 10 facts specific flashcards. So that way they are memorizing facts…but with the help of patterns in addition and subtraction.

Flashcards - 10 Facts
 

I also created a few extra math flash cards throughout the year to spice up our choices. Some of the ones I’ve used are place value – rods and units with the answer written on the back. I also have coin flashcards. Sometimes I throw in some science flashcards or sight word phrase cards. If you have a PowerPoint of anything you can print off the 6 slides per page, laminate, cut out, and ring. Just make sure you write the answers on the back so they are self-checking.

 Flashcards - Place Value 10s and 1s
 

All of these flashcards go in little bucket that I take with us to the bathrooms. As the students finish in the bathrooms they can get a set of flashcards and sit in the finished line.  This also gives them incentive to not stay in the bathrooms so long - they LOVE these flashcards and can't wait to use them.

Wednesday, June 26, 2013

Responding to Text

One of our standards is that students write brief comments about a text. After demonstrating this repeatedly during read alouds – science lessons, chapter books, etc. – I put a stack of sticky notes out and tell the students that I want them to start using them during Read to Self and Listen to Reading. They can write a comment on something they learned or write a question they had during reading. I make sure that all students have done this several times by having them leave their books out after a round of Daily 5 and making a quick checklist. This has also helped them be more concise when they share after a round. Who would have known sticky notes would be so easy to implement and keep track of?


I hope the pictures show that this can be used in Read to Self and Listen to Reading, with fiction and non-fiction, and at all levels of reading. 
 

Monday, June 24, 2013

Charts, Storage, and Formative Assessment, Oh My!

Charting Our Learning

After we have used an anchor chart and moved on I like to put it up in another location for a little longer. This is my anchor chart area in the classroom. It changes during the year but it gives the students another location to go to as a resource for spelling during Writer’s Workshop and / or Work on Writing. 


 Storage Tip
 
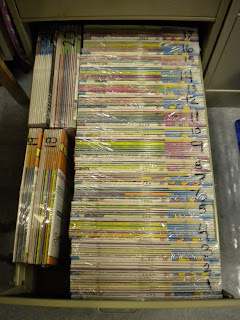
My district uses Investigations and enVision as our math programs.  We use Investigations to guide our teaching but supplement pieces of enVision when needed.  However, we get the consumables for enVision every year.  Luckily we don't get those long student books that you have to rip pages out of any more...we get shrink wrapped sets of pages.  It is much easier to pull out one or two pages you actually want to use in this format.  But the stacks and stacks of shrink wrapped pages take up a lot of room.  Until I discovered that I could fit every single piece into one filing cabinet drawer.  I use a permanent marker to write on the spine what unit it is so I can easily find the few pages I use during the year.  I will gladly give up one filing cabinet drawer to get rid of the stacks and stacks of math consumables from my shelves. 


Formative Assessment

My district is pushing formative assessment to help guide our teaching. This was a great idea one of the other teachers shared. It worked like a charm in my class. All you do is have a sticky note for each student and ask a question. They can post their note in their corresponding square on the chart. Some of my questions were: What was one thing you learned about the food chain today? Use the 3 numbers on the board and make all 4 equations in a fact family. If I know that 7+1=8, then I know 8-__=__. Write down the main character(s) in one of the books you read during Read to Self. This was a simple poster to make with a lot of flexibility in how to use.  


I know these were a bunch of random tips.  But hopefully they will give you some easy ideas you might want to implement. 
 

Saturday, June 22, 2013

Last Day of School Morning Work


I always struggle with morning work on the last day of school. It is a fun day…we have a water party at the end of the year. But we have to survive up until that point. Usually I have a summer word search but even I’m b-o-r-e-d with that. So this year an idea just came to me. And it turned out AMAZING so I thought I’d share.


I covered the tables in white butcher paper and wrote the kids’ names in my best junior high bubble writing. Then I put crayons in the middle of the table and had the kids decorate them. It was something fun and different enough to keep their attention even on the last day of school.


Friday, June 21, 2013

100th Day

 Here are my favorite 100th day activities:

100th Day Buffet

I originally found this idea on Pinterest…but I had to Dorothy-ify it and make it my own. I like the idea of the kids eating and filling 10-frames. The only problem is that my school district is very picky about making sure everything we do is tied to standards even on fun days like this. So I made the 10-frame page with equations underneath each one. This fit the ‘noticing patterns in subtraction’ standard because I make sure the 10-frames show patterns.

100 Day Buffet Recording Sheet

Basically you buy a bunch of snacks and have the students fill their 10-frames with those different snacks. They transfer their snacks one 10-frame (on a paper plate) at a time to a 10-frame paper (with 10 total 10-frames to make 100) on their desk. After all of the 10-frames are filled you begin. I would have them eat a few pieces off of each 10-frame and write the corresponding equation underneath. For example I have them everyone eat 3 pieces off their first 10-frame and then write 10-3=7. The next time I would have them eat 7 and write 10-7=3. That’s how I made sure it met the standard. At the end all the extra snacks are then put in a bag to take home. I even had my principals come watch the fun for this one to show that we can have fun and meet the standards. 


This year I made 18 plates around the room so almost all my students were busy filling up their 10-frames. That really helped this activity move quickly and kept anyone from waiting around like they did the first year. My best buy in the snack departments was the Great Value (Walmart brand) Fruity Puffs cereal. I separated the 5 or 6 colors into their own category so with one purchase I had a bunch of ‘choices’ for the buffet. Other easy ones were Smarties, M&M’s, colorful marshmallows, Red Hots, Nerds, and chocolate chips.
 

This activity in all takes over an hour so make sure to plan a chunk of time for this if you try it.

100 Chart Puzzles

I printed 14 100 charts on different color cardstock and laminated them. Then I cut them up in different shapes. The kids partner up and put the puzzle together. If I have students struggling I hand them a 100 chart to use as the base. But most of the time the kids can figure it out without the added help. This seems like a simple activity but the LOVE it. 


100 Seconds

This is another Pinterest find. What I can do in 100 seconds – with a bunch of activities like hop up and down, write the alphabet, blink, etc. This was really fun for the kids and so much fun for me to watch – seeing them blink and trying to keep up counting was hilarious. I don’t know who created this, but she was smart – it had them hop at just the right time. Then they moved onto something more restful then go back to sitting and standing. It was great to have movement in there at just the right time.


100 Year Portraits

And I’m sure you have all seen cute pictures online of what I’ll look like when I’m 100. My kids also draw pictures of what they will look like when they are 100. Because of that standard correlation I also have them write about what they will look like or act like when they are 100.  

Tuesday, June 11, 2013

Flip the Sound Mini-Lesson / Word Work Ideas


Here is another mini-lesson using a strategy for the Accuracy section of the CAFÉ wall. I use the Accuracy mini-lessons to teach strategies (flip the sound) and phonics (long a, sneaky e).


You can also tell from this video that we had begun using Word Work. I usually do a lot of Word Work activities whole group first so the students have all had a chance to practice them before it is a choice in Daily 5. For example, I have a long a, sneaky e PowerPoint where the students read the words and the picture pops up to show them if they are correct. After we have read the words as a class I have them pull out their Word Work spiral.


Since it is early on in Word Work I would have the whole class practice rainbow spelling with the PowerPoint words. If you put your PowerPoint on the screen where you can see all the slides (slide sorter view) it helps students move at their own pace. This gives me a chance to see all of the students using rainbow spelling correctly. If a child is writing the word ‘snake’ but writes the ‘s’ in blue, green, red then the ‘n’ in blue, green, red and so on then he is not really learning how the word is spelled. Many children make that mistake with rainbow spelling; but if I have them all doing it at the same time I can walk around and correct them quickly. That way when they are at Word Work independently I can work with small groups and trust that they are using rainbow spelling correctly.


As I see my students have learned a couple of different Word Work activities by using them whole group then I will let it become a choice in Daily 5. My first three activities are usually: rainbow spelling, word family flip books, sight word hunting with monster fingers.


Rainbow Spelling – all you need are crayons and paper. The students write words (word sort we have done on a pocket chart or sight words from the word wall) in 3 different colors. *Management Tip – Make them use the same 3 crayons for the whole session so they aren’t changing colors with each word*


Word Family Flip Books – all you need are word family flip books (or something like them), pencil, and paper. I use Lakeshore’s word family flip books. The link is below. The students write each word in pencil noticing the pattern in the word family.


Word Family Flip Books


Sight Word Hunting – all you need is the student’s book bag, a monster finger, pencil and paper. I use monster finger pointers from Really Good Stuff. The link is below. The students go through their books from their book bag and use the monster finger (it just keeps them focused for some reason) to hunt for sight words from our word wall and then write them down as they find them.


Monster Finger Pointers


Once these three Word Work activities have been taught it is really easy to manage. When I first started Daily 5 I got really caught up in a bunch of ‘cool’ supplies for Word Work. It ended up being a mess and I hated that choice. It is much better now that I remember to focus on the patterns in words and not the supplies. I don’t have to change the activities very often. Rainbow spelling changes based on the phonics rule and sight words so they are changing weekly. I change out the flip books to reflect word families that we have already learned so they change out every few weeks without needing to teach anything new. Sight word hunting is always changing because we add new sight words each week and the students change out their books from their book bags.


I have found that if I can make some things easier to manage then I am more likely to focus on teaching instead of supply management and/or clean up.

Monday, June 10, 2013

Accuracy Mini-Lesson


I have focused a lot on what I teach in the Comprehension mini-lessons of the CAFÉ. Here is a mini-lesson I use for the Accuracy part of CAFÉ. I use word family cards from Cherry Carl’s website. This week we had focused on short u as our phonics sound. Each day I have a quick short u word family sort like this one. I also have PowerPoints, poems, etc. that have short u instead of a specific short u word family.


On Fridays I use a few cards from each of the short u word families from the week in a slightly different way. The kids LOVE this activity. I’ll take 2-3 picture and word cards from each of the sorts and mix them up. Then I pass 1 card out to every student and tell them not to show anyone. When I start the music they have to go around the room and find their partner without talking. As soon as they have found their partner they sit down right where they are. Once I see all of them have found their match and are sitting I stop the music and let them know how long it took them. If I hear any talking I add 5 seconds to the time. They love to see how fast they can partner up and try to beat that time the next week. Then I have each partner group say their cards and we put them back on the board until we have reviewed each of the word families. This is a very engaging way to get them to focus on the phonics strategy before we have a spelling test.


Speaking of spelling tests…we don’t tell our students a list of 10 words and have them memorize those words for the week. We give them a rule – like short u – with a few examples on the newsletter. Then we do activities like the whole group word sorts, individual word work activities, etc. to go along with that rule. The spelling test is a ‘cold’ test since they don’t know the words ahead of time. We make sure they are easily phonetically sounded and spelled out. That has helped make sure they aren’t focusing on a few words but really internalizing a spelling rule. This really transfers over to their writing because they are used to stretching out words and spelling them using a rule. It takes a little more to explain this to the parents at the beginning of the year, but I think it is well worth the effort because of the results.


Here is the website I get my word family cards from:


http://www.wordway.us.com/


Scroll to the bottom of the page for the free word family resources.


http://www.wordway.us.com/FamilySets/Toonsub.pdf


(ub family set – used in description below)


It has change over the years so you’ll need to look around. You can purchase CD’s with all her stuff of get some of it for free (that’s what I did). If you go to the link specifically for the short u word family and look at the PDF I’ll explain how I use certain parts of it.


The cards of pg. 26-30 of the PDF are the picture and word cards like I used in the video. I don’t use all of them…I choose the ones I really want to focus on so the lesson doesn’t get too long. Then during word work the students might use pg. 10 of the PDF to put the words in ABC order. After we have done a word family sort together whole group then I will have morning work to review it the next day.


I level the morning work – pg. 5 would be a cut a paste and I make sure all the words on that paper were done in the whole group lesson the day before. This is the level I use for my struggling readers.


For my average readers I can use pg. 6. In this page the students have to decide if the word fits the word family or not. If it does fit the word family then they finish writing the word. They x it out if it does not belong to the word family.


For my higher readers I use pg. 9 of the PDF. This is where they see the picture and have to use the word family to write the correct word. By leveling the work I am making sure that I have introduced the same phonics rule to all my students, but changed my expectation of what they need to do to show me they understand it.


I hope this gives you some ideas of what you can do for your accuracy mini-lessons, leveling work, spelling and phonics rules. There are lots of awesome resources out there like Cherry Carl’s website…you just have to find them.

Saturday, June 8, 2013

Poetry: Student Work as Mini-Lesson

Poetry!  Do you get really excited about your poetry unit?  I do.  Our school has been on a kick about poetry because testing scores were low in that area and a bunch of people were saying it was because we didn't have any resources.  Luckily in first grade some teachers had started putted resources together a while ago so I've never felt worried.  It seems like a bunch of people want to do poetry on a shallow level all year long - like a poem a week type thing.  I disagree with that method.  If you teach poetry as a unit and really go in depth with it then I know the students will pick up so much more than if you just read a poem and do some little activities with it...but I'll get off the soap box now.
 
Our year finished off with a poetry unit.  I like it because that is so different than the other types of units we have done all year that it really grabs and holds their attention.  And that is no small feat at the end of the year!
 
Here is a quick video of a Writer's Workshop mini lesson.  I always start with a mini-lesson and then have them go out and write for a large chunk of time.  At the end of EVERY Writer's Workshop EVERY child shares his / her writing.  I feel that is a very important part of the writing process - talking about what you did and what you plan to do next.  So the students all partner or small group up and share what they did that day.  After that I will pull some examples of writing that I want to highlight.  This gives me a chance to show all the class what other authors are trying and that they could do it too.  This is one of those times - at the end of the lesson when I'm showcasing student work.


I love the freedom with which first graders approach poetry.  I can do that!  That's the type of attitude I want them looking at all writing with when we study it.  Once you immerse the class in a genre study of poetry then you will notice how willing they are to try poetry. 

Friday, June 7, 2013

Student Writing Portfolios

So each year I try to focus on one aspect of my teaching and improve. Someone once made the comment that you can’t be a good teacher if you teach everything (self contained classroom). She didn’t mean anything by that, just that it’s a ton of work. I took that comment as a personal challenge. I want to be an expert at reading and writing, at math, at science, at everything! From then on I have chosen one area in my teaching that I wanted to focus on for the year. That doesn’t mean I ignore other areas of professional development or anything…I just give myself a focus.


This year I wanted to work on my Writer’s Workshop. I love teaching writing and I feel confident in my abilities. But I wanted to really look at my practice and make sure that what I was doing aligned with my beliefs about education.


One of the best outcomes of this focus were my student portfolios at the end of the year. I send home books that students have written throughout the year. I also send home a bunch of writing that has accumulated over the year at the end. But this year I really used those student portfolios to help guide my teaching and form a more complete picture of each individual student as an author.


Here are two samples of student portfolios towards the end of the year.


I know that I can get even better next year…but I am excited at what I was able to send home at the end of the year with each student.

Saturday, April 6, 2013

Odd and Even Numbers

My class just finished a week of noticing patterns in numbers - focusing on skip counting and odd / even numbers.

I have never spent this long on these two concepts, but it went really well.  I had to share the cute things I had found...because these are definitely not my ideas...I'm not that smart!  ;O)


Let me just say that some of these plans have been planned because of our state testing and my school requires that we be absolutely silent on those testing days...so you will see that reflected in the plans on STAAR days.

The Skip Counting Rap video I refer to in the lesson plans is below.  So cute!


And the Odd Todd and Even Steven cutouts and candy distribution lesson (lots of fun) are from the amazing blog:


So, as you can see - I steal ideas from EVERYWHERE!  But here is the end result - my class is awesome at Odd and Even numbers.  So awesome that we made a video of our learning:


Hopefully this will give you some fun ideas about how to take a bunch of different ideas that you find and make them your own!  Happy teaching ~

Tuesday, April 2, 2013

FunPacks

Remember college?  I do...sort of...
 
Some of my favorite parts of college were all the projects that I did in my teacher prep program.  One of those projects was a FunPack.  These were little bags filled with books and activities for students to bring home.  Now that I teach first grade I have 5 FunPacks that I still use.  The hardest part of FunPacks is beginning them: you have to choose themes that you have books and activities, write out the info sheets for parents, figure out how to manage them, etc.
 
If you want to try - here are some of the forms I use.  You can always download them and edit - it's always nice to begin from somewhere.  That way you don't have to start from nothing!


Here are the FunPacks I use:


One other document - I print these labels and put them in the binder on Friday.  Since they are pre-made it makes it easier to put in and keep up with.  Anything to make these more manageable during the very busy times of year is a plus. 
 
 
I love FunPacks and more importantly, the kids LOVE FunPacks!  Hopefully this will give you some ideas make FunPacks a part of your class ~


Monday, March 25, 2013

Math Magic


If you have ever stapled paper into a book during Writer’s Workshop, then you know the magic that paper looking like a book can have on students and their writing. I found that same magic in math!


We are in a unit about patterns in numbers and I pulled out the old adding machine tape. All you have to do is cut strips of it and let the students start writing their numbers down. It’s like this race to see who can write the most numbers on a single strip and how many strips can you get the teacher to add on (just tape the edges to the old strip). I will say this is a bit of a nightmare sometimes because they become so voracious with writing their numbers. But it’s all in the name of learning!


If a student write the number incorrectly I write it out correctly. I know exactly who to work with if I see lots of these mistakes.


This one may not seem that impressive, but this little girl didn't even know what numbers meant when she first came to my class. She couldn't even count to 10...and now she is at 55 independently!


This is one of the options in Math Workshop from last week . This is great for those who are still writing their numbers backwards – they get the extra practice they need without even realizing that it’s work…


Also, I’m checking to see if my students have skip counting down. For the ones that still struggle I printed off these little strips. They keep them in their pencil boxes and can practice any time they have free time during the day.


Skip Counting by 2s 5s 10s Strips


I also have some 100’s charts attached. I have always used my pocket chart 100’s chart to show patterns in numbers because they have red cards for odd numbers, purple for skip counting by 10’s, blue for 5’s, etc. But then I realized that it takes FOREVER to show one pattern because you have to flip all the little number cards. It took me 7 years to figure out to put a 100’s chart on the computer screen and change the text color in seconds to show different patterns! I have never claimed to be the brightest person in the world! ;O)


100s Chart to Change in Front of Class


Another Math Workshop options is to take a 100’s chart and color it in to match the pattern. I have printed these various 100’s chart with patterns and posted them. I also have 101-200 chart for an extension. Feel free to use. This was my first year to use them and it was a huge success. When I played the clean-up song the students were desperate to ask if we could do Math Workshop the next day so they could do more! That will make any little teacher’s heart swoon ~


100s Chart with 10s Pattern

100s Chart with 25s Pattern

100s Chart with 3s Pattern

100s Chart with 4s Pattern

100s Chart with 5s Pattern

100s Chart with 2s Pattern Odd and Even